Wednesday, August 18, 2010

Plastic Ice Cream Pails....

Can you ever have enough?

I don't know about you, but I use them for EVERYTHING!!  We use them to do chores; taking food trimmings to the birds, at times they are water buckets, and they can even help collect eggs.  They are used for organizing craft projects, hold assorted nails, or even help with household cleaning!  So, yesterday when I was looking for a container to hold paint, I decided I needed another ice cream pail!!

I checked under the sink.  That's where our extra pails are stored.  All I found was about 7 lids, but no bucket!  How does that happen?  (Please see above.) Apparently the general use of ice cream pails favors activities WITHOUT lids.  Since I knew my painted would live a rather extended life in this pail, I needed a lid.  So, I'd need to search a bit further for a bucket.

Luckily, the freezer is right next to the sink!  My search area of choice.  I knew we were out of ice cream.  Trust me, I've CHECKED!!  I guess I should say, we're out of 'eatable' ice cream.   Somehow a bucket of 'Cookie N Cream" ice cream was forgotten.  Alas, that delicious mixture of vanilla ice cream and chocolate cookies was totally freezer burnt.  NASTY!!!  Regardless, I still wanted that bucket!

So, a little hot water around the edges loosened it right up.  I was about to put it in the trash, when I spotted one of the birds walking by.  Hum.......  So, I grabbed my flip video camera, (LOVE THAT THING!!!), and out the door I went!

I had no doubt they'd eat it.  They will eat almost everything, except had rooted vegetables, unless they are cooked to soften them up.  I'll leave out all the things they will eat, but trust me, NOTHING is off their menu.  It doesn't have to be vegetable or fruit matter either!

Note Tom can actually 'tighten up' his snoodle when he wants too!!  No strutting when there's ice cream around!!!    Too bad the ducks were out in the pasture.  I would have liked to see what they thought of it. 

Monday, August 16, 2010

Bud Grafting Apple Trees

We have a Red Delicious Apple tree at the top of our lane. I'll admit I'm not being a huge fan of Red Delicious apples, but these apples are quite good. Good enough that when it became apparent that the tree was having some 'age' issues, aren't we all, something needed to be done.


As you can see, it's suffered some wind damage, resulting in the loss of some significant branches. Somehow it seems to make it year after year. Like most of our trees, it leans in an Easterly direction. I guess that's what happens when you live on the top of a "Mountain" in Iowa, and get hit relentless strong North West winds 6+ months out of the year.


So, a few years ago I started checking into grafting. There were spring grafting workshops, but I was always 'too late' to get enrolled, and they were using 'their' apple trees. I wanted to use 'our' apple tree. I finally decided that maybe I could just do it myself. Finding rootstock was my next challenge. You see, in order to get 'exactly' the tree you have, you need to 'graft' it onto another tree. Seeds will NOT give you an exact replica. Crazy huh!!

After three years, yesterday I finally acquired two M26 rootstock trees. This rootstock will give me mid sized apple trees, approximately 10' in height. If all goes to plan that is!

The first step is to cut off a newer branch from the apple tree and trim off the leaves. Like this!


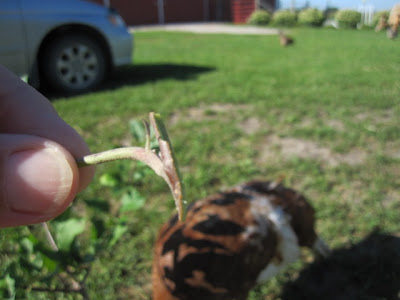
From this branch you need to remove a bud. You do this with a Knife! Yes Rilda, I used your nice little orange one! The blade that can do it all! You simply make a cut across the top of the stem, then coming under the bark with the knife, you shave it off. You end up with a bud like this!


All the information needed to make a 'new tree' is in that little bud under the bark. Is that amazing or what! You leave the little stem on so you have something to hang onto. It will dry up and fall off as the bud is absorbed into the rootstock.

Next you need your rootstock and a turkey. Oh wait, just the rootstock! Turkey's LOVE APPLES and this one is a little early! She really just wants to be sure there's nothing to eat NOW!!


Next you take your knife again, and make a "T" cut in your rootstock.
You carefully open up the bark to allow the bud to be inserted.


Next, you insert the bud.


Carefully wrap the bud in tight to the rootstock.
I used a strip of plastic garbage bag and scotch tape.


Now you wait.
In a couple weeks the stem should fall off.
If all goes well the bud will be absorbed into the rootstock and in 3-4
years you'll have a fruit bearing tree!!!

With apples exactly like the ones we get now.
It's the SAME TREE AFTER ALL!
Apples like THIS!


Want more information?

Here's an interesting clip from You Tube.


Friday, August 13, 2010

Fried Chicken - joke


Our teacher asked us what our favorite animal was, and I said, "Fried
chicken." She said I wasn't funny, but she couldn't have been right,
everyone else in the class laughed

My parents told me to always be truthful and honest, and I am. Fried
chicken is my favorite animal. I told my dad what happened, and
he said my teacher was probably a member of PETA. He said they love
animals very much. I do, too. Especially chicken, pork and beef.

Anyway, my teacher sent me to the principal's office. I told him what
happened, and he laughed too. Then he told me not to do it again.

The next day in class my teacher asked me what my favorite live animal
was. I told her it was chicken. She asked me why, just like she'd
asked the other children. So I told her it was because you could make
them into fried chicken. She sent me back to the principal's office
again. He laughed, and told me not to do it again.

I don't understand. My parents taught me to be honest, but my teacher
doesn't like it when I am. Today, my teacher asked us to tell her what
famous person we admire most.

I told her, "Colonel Sanders".

Guess where I am now...

Tuesday, August 10, 2010

The Rain Garden

When we moved to our acreage a little over 10 years ago, we didn't realized that Farmers loved to bury things! So, when we started to see some major indentations in our lawn, we asked around. Sure enough, some old grain bins and shed foundations had been disassembled and buried. We were left with the decision, so we leave them alone or fill them in.

The 'sink hole' closest to our house, and right out our South door seemed to be the worst. When it rained, which has been more often than not this year, we ended up with standing water. This really HAD to stop! Not that the ducks cared! They liked having a little pond for a day or so.

A few weeks ago, Bill went with me to a Master Garden 'work shop' in which a rain garden was constructed. Rain gardens are used to stop erosion, prevent unnecessary water run off and filter water naturally. The project was located in Cedar Rapids, at a home that had suffered some flood damage in 2008. The owner wanted a pretty garden, with native plants and that would help prevent excess rain water from entering the sewer system.

This project lead to a discussion about fixing our own 'standing water problem', and thoughts of adding our own rain garden. When I came upon some Native Iowa Plants on sale, it was "GAME ON"!!

When selecting plant for a rain garden, you would like them to have a deep fibrous root system. This will help filter more water. Since we used plants Native to our area, they should be able to handle our normal 'living' conditions.

The first step in our project was to haul in some soil, aka = dirt! In stepped the world's best neighbor, Alan!! He brought over his tractor and bucket and took soil from our cattle yard and filled in the 'hole'. It took 10 buckets loads to get it level.

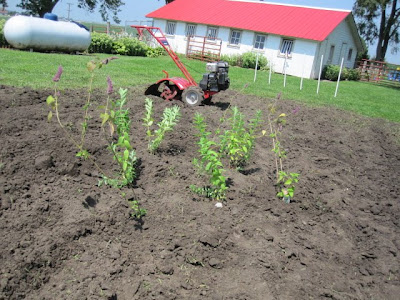
Then we used Jeff's tiller to work up the soil. Okay, Bill used Jeff's tiller. I just pointed and directed a lot! Here's the first plants that went in. 4 - Great St. John's Wort (yellow flowers) and 4 - Anise Hyssop (purple flowers). I LOVE Anise Candy, so thought this would be a great addition to the garden.

Other plants added - Indian Paintbrush, Silky Aster, Rattlesnake Master, Purple Cone Flower (along with Sundown - red - and Sunrise - yellow - cone flowers), Swamp Milkweed, Blazing Star, Wild Lupine, Mist Flower, False Blue Indigo, and Sweet Black-Eyed Susan.


These poor plants were so root bound.
I did several cross cuttings in order to open their root balls up.
I'm hoping they will be able to spread naturally and overcome
there tight conditions. Time will tell!
Being Natives, they should be hardy enough.


BUGS!!!

Ugh, the False Blue Indigo had mites!
No wonder it looked so sad.
I hand picked them off and I'll watch for more.


Kruz is a GREAT HELPER!!
He made sure Bill dug the holes deep enough.


We had butterflies before the plants were even in the ground!


Some mulch was added, along grass seed and straw.
The fence is required to keep the birds out!
Cougar was walking the fence line and gave
chase to a couple of hens.
GOOD BOY COUGAR!

It's going to take a year or two for it to fill in.


Birds at the perimeter!
They ALWAYS know when food is available.
We did have a few 'fence breaches', we'll need to keep an
eye out for bird invasions.

At least the ducks seemed to be sober!
Jeff thought it would be funny to bring out some
fermented fruit trimming.
The ducks were a little 'sauced' on Saturday.